Saturday, February 21, 2015

Nunit Setup Environment in VisualStudio with Example Program


  • NUnit is a unit-testing framework for all .Net languages. 
  • It is written entirely in C# and has been completely redesigned to take advantage of many .NET language features, for example custom attributes and other reflection related capabilities.
  •  NUnit brings xUnit to all .NET languages.

To Setup Environment For NUnit follow the below Steps:

  • Download Nunit  from below URL: 
          Download Nunit


Click on Nunit-2.6.4.msi to download setup

  • Navigate to downloaded Nunit-2.6.4.msi and install.


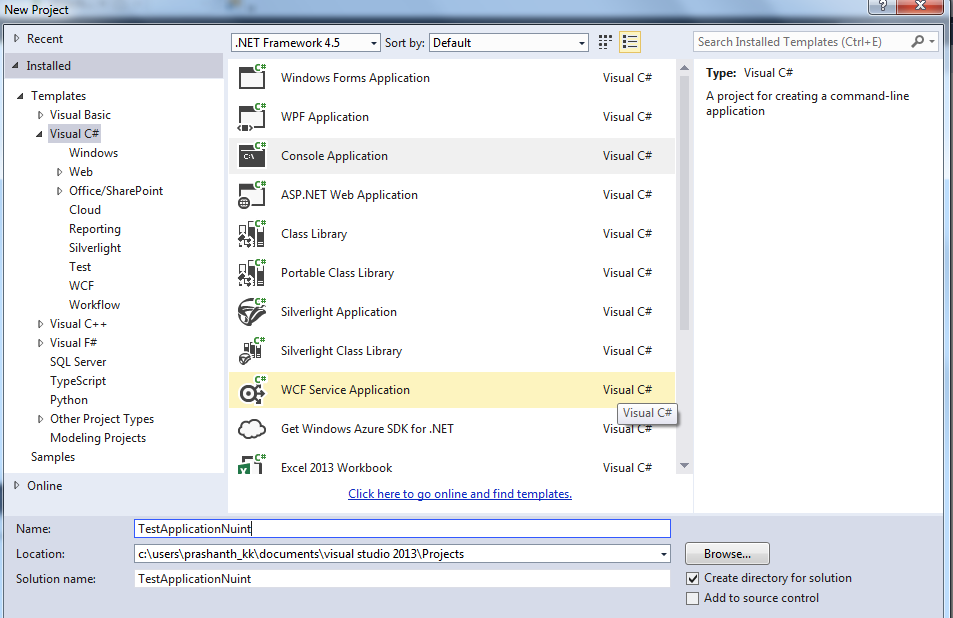
Open Visual Studio File -> New -> Project-> Console Application


  • RightClick on solution Explorer and Add new class


Add Downloded Reference .dll files in the project 
To find Nunit Reference Library(.dll ) files navigate to installed folder

C:\Program Files (x86)\NUnit 2.6.4\bin\framework
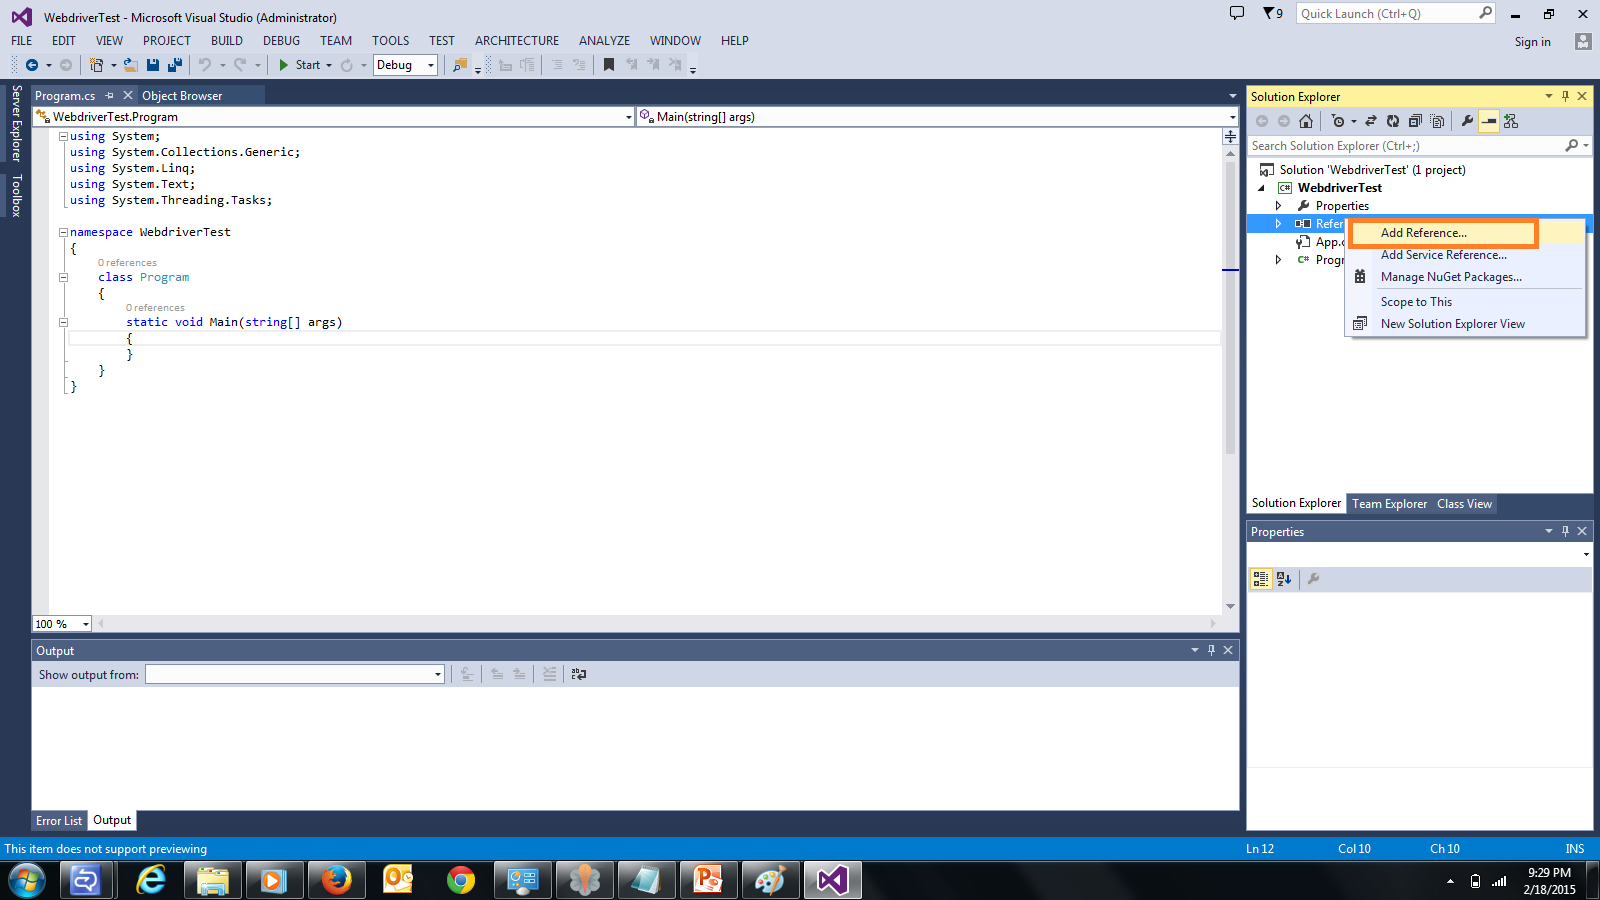
  • Add reference library from solution explorer

Browse Librery


 C:\Program Files (x86)\NUnit 2.6.4\bin\framework
 

  Click OK.

Also add Selenium Webdriver Library click on below url.


After that add the below namespaces
using OpenQA.Selenium;
using OpenQA.Selenium.Chrome;
using NUnit.Framework;
 Note : In the below example i used ChromeDriver

Source code :


using System;

using System.Collections.Generic;
using System.Linq;
using System.Text;
using System.Threading.Tasks;
using OpenQA.Selenium;
using OpenQA.Selenium.Chrome;
using NUnit.Framework;

namespace NunitTest
{
    [TestFixture]
    class Checkurl
    {
        [Test]
        public void checklink()
        {
            string actualurl = "http://automationplace.blogspot.com/";
            string expectedurl = "http://automationplace.blogspot.com/";
            Assert.AreEqual(actualurl, expectedurl);
        }
        [Test]
        public void checkurl()
        {

            IWebDriver driver = new ChromeDriver(@"C:\Users\Prashanth_KK\Documents\visual studio 2013\Projects\WebdriverTest\packages\WebDriver.ChromeDriver.26.14.313457.1\tools");
            driver.Navigate().GoToUrl("http://automationplace.blogspot.com/");
            driver.Close();
           

        }
    }
}


Open Nunit.exe 


Click on File ->  Open Project 

C:\Users\Prashanth_KK\Documents\Visual Studio 2013\Projects\NunitTest\NunitTest\bin\Debug

Open .exe


 After opening .exe you find the test methods


Click on Run .


That's it.

Hope you like this post.
Hit Like button on Facebook.


Wednesday, February 18, 2015

C# Selenium Webdiver Automation Setup Environment in VisualStudio


Follow the below steps to Setup the Environment in Visual Studio

  1. Download C# Library from below URL:
      Click here to Download


     2.  Open Visual Studio Click on New -> Project ,Select Console Application


    3 . Give the Meaningful name for the project
    4 . On Solution Explorer Add the downloaded C# Library, See the below images to add  reference  library.

Right click on References from solution explorer
    

Click on Browser.


Navigate to the C# Library Downloaded Folder


Open on net40


Select all .dll files


After Selecting .dll files your screen looks like below


Thats it,

After that add the below namespaces

using OpenQA.Selenium;
using OpenQA.Selenium.Chrome;

 Note : In the below example i used ChromeDriver

 Source Code :

using System;
using System.Collections.Generic;
using System.Linq;
using System.Text;
using System.Threading.Tasks;
using OpenQA.Selenium;
using OpenQA.Selenium.Chrome;

namespace WebdriverTest
{
    class Program
    {
        static void Main(string[] args)
        {

            IWebDriver driver = new ChromeDriver(@"C:\my\path\to\chromedriver
\directory");

            driver.Navigate().GoToUrl("http://automationplace.blogspot.com/");
            driver.Close();
           
        }
    }
}
 

Run the program.

Thats it.

Hope you like this post.
Hit Like button on facebook.


Monday, February 16, 2015

List of JUnit annotations With Example


@Test:


  • The Test annotation tells JUnit that the public void method to which it is attached can be run as a test case. 
  • Any exceptions thrown by the test will be reported by JUnit as a failure. If no exceptions are thrown, the test is assumed to have succeeded. - 
Example Program :

public class MyTestClass {
    @Test
    public void myTestMethod() {
        /**
         * Use Assert methods to call your methods to be tested.
         * A simple test to check whether the given number is equal
         */
int a=10;
int b-10;
       org.junit.Assert.assertTrue(a==b);
    }
 }

@Test(timeout=100):

  • Somethimes we need to mesure the performance interms of time. The @Test annotations provides an optional parameter called 'timeout', which causes a test to fail if it takes longer than a specified amount of clock time (measured in milliseconds).

Example Program :

public class MyTestClass {
    @Test@Test(timeout=100)
    public void myTestMethod() {
        /**
         * The IO operation has to be done with in 100 milli seconds. If not,
         * the test should fail.
         */
       ....
       ....
    }
 }


@Before


  • When writing tests, it is common to find that several tests need similar objects created before they can run. Annotating a public void method with @Before causes that method to be run before the Test method. The @Before methods of super classes will be run before those of the current class. 

Example Program (in selenium):

public class MyTestClass {
     
    @Before
    public void initialize() {
        Webdriver driver=new FirefoxDriver();
    }
     
    @Test
    public void myTestMethod() {
       
driver.get("http://www.msn.com")
    }
 }

@After :

  • If you allocate external resources in a Before method you need to release them after the test runs. Annotating a public void method with @After causes that method to be run after the Test method. All @After methods are guaranteed to run even if a Before or Test method throws an exception. The @After methods declared in superclasses will be run after those of the current class

Example Program (in selenium):

public class MyTestClass {
     
    @Before
    public void initialize() {
        Webdriver driver=new FirefoxDriver();
    }
     
    @Test
    public void myTestMethod() {
       
driver.get("http://www.msn.com")


    }
  @After
    public void close() {
        driver.quit()
    }
 }

//After Running Testcase its close browser

@BeforeClass :

  • @BeforeClass causes it to be run once before any of the test methods in the class. The @BeforeClass methods of superclasses will be run before those the current class.

Example Program :

public class MyTestClass {
     
    @BeforeClass
    public void initGlobalResources() {
        /**
         * This method will be called only once per test class.
         */
    }
     
    @Before
    public void initializeResources() {
        /**
         * This method will be called before calling every test.
         */
    }
     
    @Test
    public void myTestMethod1() {
        /**
         * initializeResources() method will be called before calling this method 
         */
    }
     
    @Test
    public void myTestMethod2() {
        /**
         * initializeResources() method will be called before calling this method 
         */
    }
 }

@Ignore :

  • Sometimes you want to temporarily disable a test or a group of tests. Methods annotated with Test that are also annotated with @Ignore will not be executed as tests. Also, you can annotate a class containing test methods with @Ignore and none of the containing tests will be executed. Native JUnit 4 test runners should report the number of ignored tests along with the number of tests that ran and the number of tests that failed
 Example Program (in selenium):

public class MyTestClass {
     
    @Before
    public void initialize() {
        Webdriver driver=new FirefoxDriver();
    }
     
    @Test
    public void myTestMethod() {
       
driver.get("http://www.msn.com")


    }
    @Ignore
     @Test
       public void myTestMethod() {
       
driver.close();


    }
     
  @After
    public void close() {
        driver.quit()
    }
 }


Difference between @Before and @BeforeClass annotations

  • Test method marked with @Before annotation will be executed before the each @Test method. Means if there are 5 @Test methods in your class then @Before test method will be executed 5 times.
  • Test method marked with @BeforeClass annotation will be executed just before the class. Means @BeforeClass method will be executed only once before the class even if there are 5 @Test methods in your class.

Difference between @After and @AfterClass annotations

  • Same as @Before annotation, Test method marked with @After annotation will be executed after the each @Test method.
  • @AfterClass annotation will be executed only once after last @Test method executed.

Execute bellow given @Before and @After annotations example in your eclipse

package junitpack;

import org.junit.After;
import org.junit.AfterClass;
import org.junit.Before;
import org.junit.BeforeClass;
import org.junit.Test;
import org.openqa.selenium.By;
import org.openqa.selenium.WebDriver;
import org.openqa.selenium.firefox.FirefoxDriver;

public class junittest2 {
 private static WebDriver driver;
 
@Before
public void openbrowser() {
 System.out.print("\nBrowser open");
 driver = new FirefoxDriver();
 driver.manage().window().maximize();
 driver.get("http://www.automationplace.blogspot.com");
}

@After
public void closebrowser() {
 System.out.print("\nBrowser close");
 driver.quit();
}

 @Test
 public void test1() throws InterruptedException{ 
 driver.findElement(By.xpath("//input[@name='fname']")).sendKeys("junittest2 class-test1");
 System.out.print("\njunittest2 class-test1 method is executed");
 Thread.sleep(2000);
 }

 @Test
 public void test2() throws InterruptedException {
 driver.findElement(By.xpath("//input[@name='fname']")).clear();
 driver.findElement(By.xpath("//input[@name='fname']")).sendKeys("junittest2 class-test2");
 Thread.sleep(2000);
 System.out.print("\njunittest2 class-test2 method is executed");
 }
}

When you execute above example in eclipse, Bellow given result will be displayed in console.
Console Output :
Browser open
junittest2 class-test1 method is executed
Browser close
Browser open
junittest2 class-test2 method is executed
Browser close

Hope you like this post.