Monday, March 16, 2015

Sunday, March 15, 2015
Handling Scrollbar in Selenium webdriver

In this Tutorial we are going to see how to handle Scroll bar in the Web browser.
In this Example .
- Navigating to "http://automationplace.blogspot.in/"
- Scroll down the Scrollbar to down and Click on "OlderPost" link
- Assert the Actual and Expected URL's
The below Code is used to Scroll the Scrollbar down
EventFiringWebDriver
eventFiringWebDriver = new
EventFiringWebDriver(webDriver);
eventFiringWebDriver.executeScript("scroll(0,4000)",args);Source code:
import org.junit.Assert;
import
org.openqa.selenium.By;
import org.openqa.selenium.JavascriptExecutor;
import
org.openqa.selenium.WebDriver;
import org.openqa.selenium.WebElement;
import
org.openqa.selenium.firefox.FirefoxDriver;
import
org.openqa.selenium.support.events.EventFiringWebDriver;
public class testscroll {
public static void main(String[] args) throws
InterruptedException {
// TODO Auto-generated
method stub
WebDriver
webDriver = new FirefoxDriver();
webDriver.get("http://automationplace.blogspot.in/");
webDriver.manage().window().maximize();
EventFiringWebDriver
eventFiringWebDriver = new EventFiringWebDriver(webDriver);
eventFiringWebDriver.executeScript("scroll(0,4000)",args);
webDriver.findElement(By.id("Blog1_blog-pager-older-link")).click();
Thread.sleep(8000);
String
actual="http://automationplace.blogspot.in/search?updated-max=2015-02-16T18:02:00-08:00&max-results=7";
Thread.sleep(5000);
String
expectedurl=webDriver.getCurrentUrl();
Assert.assertEquals(expectedurl,
actual);
System.out.println("result is
correct");
}
}
Thanks,
Hope you like this post.
Saturday, February 21, 2015
Nunit Setup Environment in VisualStudio with Example Program

- NUnit is a unit-testing framework for all .Net languages.
- It is written entirely in C# and has been completely redesigned to take advantage of many .NET language features, for example custom attributes and other reflection related capabilities.
- NUnit brings xUnit to all .NET languages.
To Setup Environment For NUnit follow the below Steps:
- Download Nunit from below URL:

Click on Nunit-2.6.4.msi to download setup
- Navigate to downloaded Nunit-2.6.4.msi and install.

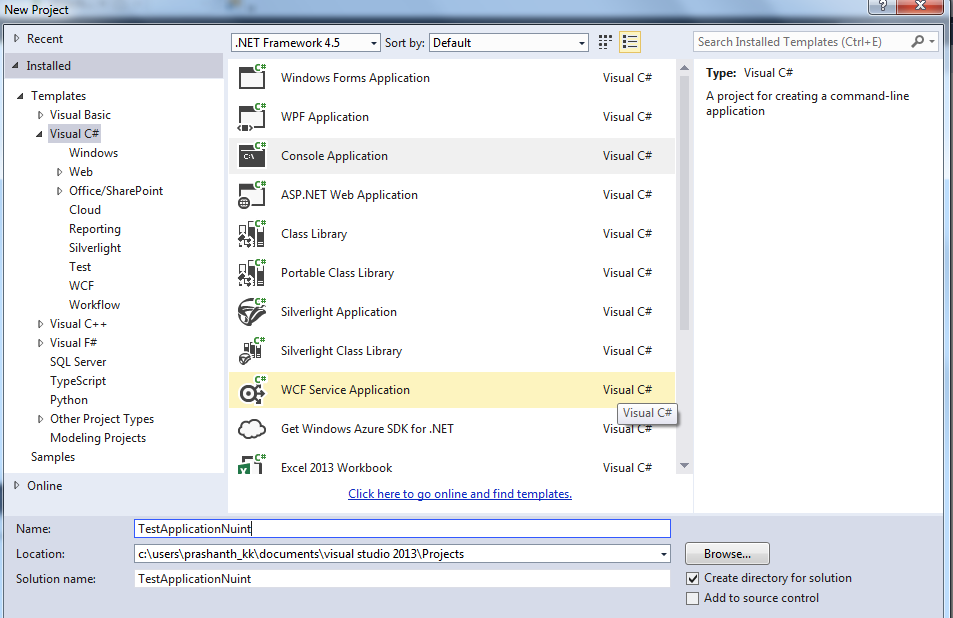
Open Visual Studio File -> New -> Project-> Console Application
- RightClick on solution Explorer and Add new class

To find Nunit Reference Library(.dll ) files navigate to installed folder
C:\Program Files (x86)\NUnit 2.6.4\bin\framework
- Add reference library from solution explorer

Browse Librery

C:\Program Files (x86)\NUnit 2.6.4\bin\framework

Click OK.
Also add Selenium Webdriver Library click on below url.
After that add the below namespaces
using OpenQA.Selenium;
using OpenQA.Selenium.Chrome;
using OpenQA.Selenium.Chrome;
using NUnit.Framework;
Note : In the below example i used ChromeDriver
Source code :
using System;
using System.Collections.Generic;
using System.Linq;
using System.Text;
using System.Threading.Tasks;
using OpenQA.Selenium;
using OpenQA.Selenium.Chrome;
using NUnit.Framework;
namespace NunitTest
{
[TestFixture]
class Checkurl
{
[Test]
public void checklink()
{
string actualurl = "http://automationplace.blogspot.com/";
string expectedurl = "http://automationplace.blogspot.com/";
Assert.AreEqual(actualurl, expectedurl);
}
[Test]
public void checkurl()
{
IWebDriver driver = new ChromeDriver(@"C:\Users\Prashanth_KK\Documents\visual
studio
2013\Projects\WebdriverTest\packages\WebDriver.ChromeDriver.26.14.313457.1\tools");
driver.Navigate().GoToUrl("http://automationplace.blogspot.com/");
driver.Close();
}
}
}
Open Nunit.exe

Click on File -> Open Project
C:\Users\Prashanth_KK\Documents\Visual Studio 2013\Projects\NunitTest\NunitTest\bin\Debug
Open .exe

After opening .exe you find the test methods

Click on Run .

That's it.
Hope you like this post.
Hit Like button on Facebook.
Hope you like this post.
Hit Like button on Facebook.
Subscribe to:
Posts (Atom)